
Every Thanksgiving, my grandmother’s kitchen was filled with the warm, spicy aroma of her legendary apple pie. The golden, flaky crust would crisp perfectly without pre-baking. This secret was passed down through generations of home bakers. When making an origami apple pie before fold, knowing how to prepare the crust is key.
Pre-baking apple pie crust isn’t always necessary. Your pie’s success depends on several factors. These include your chosen technique and filling type. The method of pre-baking can vary based on your recipe and desired outcome.
For home bakers aiming for the perfect apple pie, knowing when and how to handle your crust is important. The key is finding the right balance between technique, ingredient quality, and baking methodology.
Key Takeaways
- Pre-baking is not mandatory for most fruit pies
- Freezing pie dough helps maintain structural integrity
- Different pie styles require unique crust preparation techniques
- Proper dough chilling prevents shrinkage during baking
- Pie weights can be useful for specific crust preparations
- Moisture control is key to preventing soggy crusts
Understanding Pre-Baking: A Guide to Perfect Pie Crusts
Learning to fold pastry starts with pre-baking. This step is key to making your pies perfect. It ensures a crisp crust every time.

Pre-baking apple pie involves several important steps. These steps can greatly improve your baking. Let’s explore why this technique is so important.
What is Pre-Baking?
Pre-baking, or blind baking, is essential for a great pie crust. It means baking the crust before adding the filling. This step stops soggy bottoms and gives you a crisp, golden crust.
When Pre-Baking is Necessary
- Custard-based pies that require minimal additional baking
- No-bake fresh fruit pies
- Pies with wet or liquid fillings
- Cream-based pie recipes
Different Types of Pre-Baking Methods
Bakers use two main pre-baking methods:
| Method | Temperature | Duration | Purpose |
|---|---|---|---|
| Partial Pre-Baking | 425°F | 20 minutes | Prepare crust for fillings requiring additional cooking |
| Full Pre-Baking | 425°F | 40 minutes | Complete crust for no-bake or minimal-bake fillings |
“The secret to a perfect pie is all in the crust preparation.” – Professional Pastry Chef
Pro tip for pastry folding techniques: Always use pie weights or dried beans to prevent the crust from puffing up during pre-baking. Chill your dough before rolling and baking to ensure maximum flakiness.
Why Apple Pies Don’t Need Pre-Baking
Making the perfect apple pie is all about understanding how fruit desserts bake. Unlike other pies, apple pies don’t need to be pre-baked. This makes the whole process easier. The way you fold the pie crust and fill it lets both parts bake together, blending their flavors beautifully.

- Freeze the pie dough before baking to keep its shape
- Don’t poke holes in the bottom crust
- Keep the crust safe from juice spills
“The secret to a perfect apple pie is letting the ingredients dance together during baking” – Pastry Chef Sarah Miller
Your pie will bake for 40-50 minutes. It will turn golden brown and the filling will bubble. Baking it straight away brings out the best flavors without the need for pre-baking.
| Ingredient | Quantity | Purpose |
|---|---|---|
| Medium Apples | 5 | Filling Base |
| Granulated Sugar | ½ cup | Sweetness |
| Cinnamon | 2 tsp | Flavor Enhancement |
Pro tip: Skipping pre-baking makes your apple pie more authentic and flavorful. It lets the natural taste of your ingredients shine.
For more detailed information on crust preparation and when pre-baking is necessary, you can explore Origami Apple Pie Before Fold, which highlights advanced techniques for pie baking.
Essential Equipment for Pie Crust Preparation
Making the perfect pie crust is not just about skill. It also needs the right tools and equipment. Whether you’re trying origami-inspired pie crust shaping or pre-baking an apple pie, the right gear is key.
Must-Have Tools for Baking Success
For baking success, you need a few essential items:
- Food processor for precise dough mixing
- Sturdy rolling pin with smooth surface
- Metal pie dish for even heat distribution
- Plastic wrap for dough protection
- Sharp pastry cutter or knife
Pie Weights and Creative Alternatives
Pre-baking needs special tools to stop the crust from bubbling. While ceramic pie weights are great, you can also use creative alternatives:
| Weight Type | Pros | Cons |
|---|---|---|
| Ceramic Pie Weights | Reusable, even heat distribution | More expensive |
| Dry Beans | Inexpensive, readily available | One-time use |
| Uncooked Rice | Lightweight, cheap | Can break down over multiple uses |
Temperature Control Essentials
Controlling temperature is key for flaky, golden crusts. Get an oven thermometer for accurate baking. A reliable baking sheet also helps with even heat during pie crust preparation.
“The right tools transform good baking into great baking.” – Professional Baker’s Secret
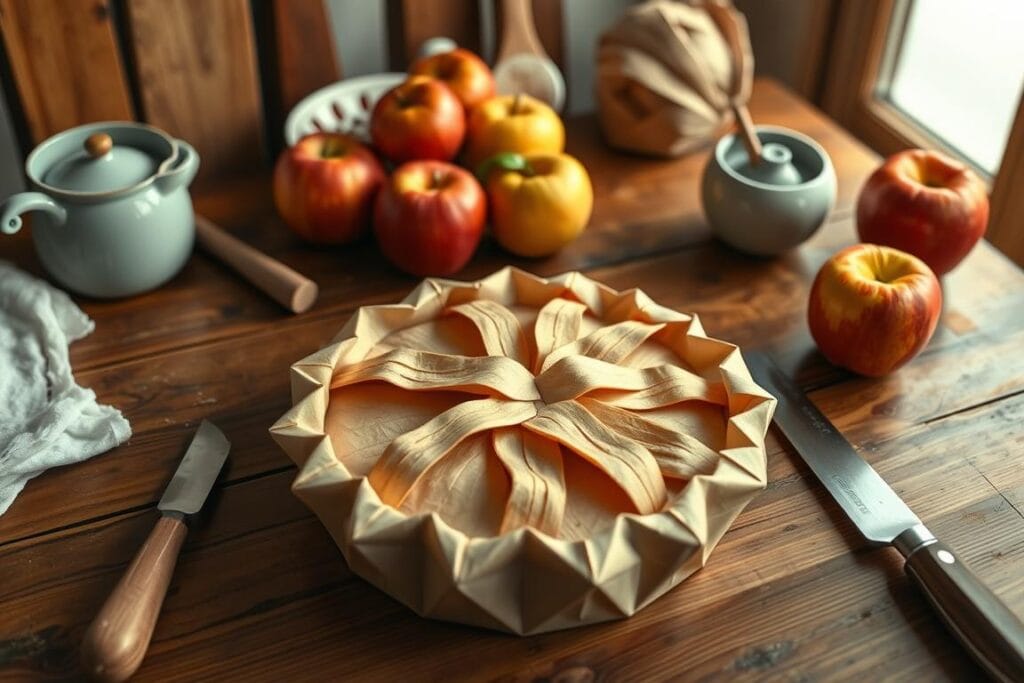
Origami Apple Pie Before Fold: Advanced Techniques
Turning your apple pie crust into art needs skill in origami apple pie before fold. Professional bakers see pie dough as a canvas for creativity.
The art of layered pie dough folding is more than just traditional methods. You’ll learn techniques that make your pie stand out:
- Create detailed geometric patterns in your crust
- Apply precise folding inspired by origami
- Make unique textures through dough manipulation
When you start origami apple pie before fold, remember these key points:
- Begin with cold, rested pie dough
- Use a sharp knife or pastry wheel for clean cuts
- Practice gentle, deliberate folding movements
“Pie crust is an art form that rewards patience and precision” – Professional Pastry Chef
Improving your layered pie dough folding takes practice. Each fold adds a special texture that makes your pie crust flaky and visually appealing. The trick is to keep consistent pressure and keep your dough cold.
By using these advanced techniques, you’ll turn a simple apple pie into a stunning masterpiece. It will impress both your eyes and taste buds.
Creating the Perfect Base: Dough Preparation Methods
Making a great pie crust needs precision and care. The dough’s preparation is key, with folding techniques creating that flaky texture bakers love.
Measuring with Precision
Accuracy is vital when making your pie dough. Here are the steps for measuring ingredients:
- Use the spoon-and-level method for dry ingredients
- Invest in a digital kitchen scale for exact measurements
- Ensure all ingredients are at the right temperature
Mastering Layered Pie Dough Folding
The secret to a remarkable pie crust is in your folding technique. Professional bakers know that folding creates flaky layers:
- Cut cold butter into small, uniform pieces
- Work quickly to keep butter cold
- Use a food processor for consistent texture
- Fold dough gently to maintain butter layers
“The magic of a perfect pie crust is in the gentle touch and cold ingredients.” – Professional Pastry Chef
Chilling and Resting
Your dough needs time to relax. After mixing, shape it into a disc and refrigerate for at least 45 minutes. This step allows gluten to settle and butter to firm up, making the crust tender and flaky.
Remember, patience is your greatest ally in creating the ultimate pie base. Take your time, respect the ingredients, and your pastry will reward you with incredible results.
Temperature Control: The Key to Flaky Crusts
Mastering temperature control is key in making a flaky pie crust. Cold ingredients turn a simple pie crust into a flaky masterpiece. This will wow even the pickiest eaters.
“Cold is king when it comes to perfect pie crusts!” – Professional Pastry Chefs
Your pie crust journey starts with careful temperature management. Make sure all ingredients are chilled before mixing. Butter should be ice-cold, and water should be almost freezing.
- Use unsalted butter straight from the refrigerator
- Chill mixing bowls and utensils before starting
- Keep dough refrigerated between preparation steps
- Utilize ice water for optimal dough consistency
When making your apple filling, keep temperature control in mind. Chill the dough for at least 30 minutes before rolling. This step relaxes gluten and prevents shrinkage during baking.
| Temperature Stage | Recommended Action | Purpose |
|---|---|---|
| Ingredient Prep | Chill butter, water | Prevent gluten development |
| Dough Mixing | Use cold tools | Maintain butter’s solid state |
| Before Baking | Refrigerate 30 minutes | Relax gluten structure |
Preheat your oven to 425°F. Place a baking sheet inside while it heats up. This trick ensures a crisp, golden bottom crust. It makes your apple pie truly exceptional.
Common Mistakes to Avoid in Pie Crust Making
Making the perfect pie crust needs precision and care. Many home bakers accidentally ruin their pastry by making big mistakes. Knowing these common errors can help you make a beautiful pie with a perfect crust.
To explore more tools and techniques for baking perfection, check out Alex’s Essential Pie Crust Guide.
Overworking the Dough: A Recipe for Disaster
Creating a pie crust like origami requires a gentle touch. Overworking the dough makes it tough and chewy. The trick is to mix ingredients just until they come together. Handle your dough like you’re dancing, not wrestling.
- Mix ingredients minimally
- Use cold hands or tools
- Stop kneading when dough forms
Temperature Troubles in Pastry Making
Temperature is key for a flaky, tender crust. Warm ingredients can make your pastry dense. Keep everything cold – your butter, water, and work surface.
“Cold ingredients are the secret to a perfect pie crust” – Professional Pastry Chef
Pan Preparation Pitfalls
Not preparing the pan right can cause a soggy or stuck crust. Use the right method to transfer your dough without stretching. This prevents shrinkage during baking. Gentle handling and proper chilling are key for a great pie crust.
- Chill dough before rolling
- Avoid stretching when placing in pan
- Use parchment paper for easy removal
Advanced Tips for Crispy Bottom Crusts
To get a perfectly crisp bottom crust, you need some smart baking tricks. Start with the origami apple pie before fold method. This involves picking the right baking surface and making your crust moisture-resistant.
Professional bakers have some top tips for a flawless pie base:
- Use a metal pie dish for better heat transfer
- Place the pie on the bottom rack of the oven
- Preheat a baking sheet for direct heat on the bottom
How you fill your pie is also key to avoiding a soggy crust. Here are some methods to keep your crust crisp:
- Pre-cook your apple filling to cut down on moisture
- Brush the bottom crust with egg white
- Add a thin layer of breadcrumbs or ground nuts
“A crispy crust is the hallmark of a truly exceptional apple pie” – Pastry Chef Sarah Thompson
Keeping an eye on the temperature is vital. Bake at 425°F for 15-20 minutes to start. Then, lower it to 375°F to finish without burning.
| Technique | Moisture Prevention | Crispiness Factor |
|---|---|---|
| Egg White Barrier | High | Medium-High |
| Pre-cooked Filling | Very High | High |
| Bottom Rack Baking | Medium | High |
By mastering these methods, your apple pie will go from good to amazing. You’ll get a crispy bottom crust that will impress everyone.
To learn more about baking methods and tools, refer to this comprehensive pie guide.
Decorative Techniques for Apple Pie Tops
Make your apple pie stand out with creative pie crust designs. These techniques will wow your family and guests. Layered pie dough folding is more than a method—it’s an art that boosts your baking.
- Classic Lattice Design: Weave strips of dough in an over-under pattern
- Braided Edge Technique: Make a rope-like border around the pie
- Cutout Shape Patterns: Use cookie cutters for unique decorations
Get a pro finish with these tips:
- Vary lattice strip widths for interest
- Brush with egg wash for a golden look
- Sprinkle turbinado sugar for extra sweetness
“A beautifully decorated pie is a feast for both eyes and taste buds” – Professional Baker’s Wisdom
For the advanced, try origami-inspired designs. These turn your pie into a masterpiece. Layered pie dough folding lets you create patterns that show off your creativity and skill.
Practice is key. Each pie is a chance to get better and impress your guests with a beautiful dessert.
Conclusion
Your journey through pre-baking apple pie preparation shows the art of making the perfect pie. You might be learning origami apple pie techniques or improving your crust. Each step is important in turning simple ingredients into a tasty dessert.
Making an amazing apple pie takes patience and practice. Knowing about temperature, dough, and decorations can make you a pro. Paying attention to small details can greatly improve your pie.
Letting your pie cool completely is key. It lets the filling set and flavors to fully develop. Your desire to try new things and learn will help your pie turn out great. With each try, you’ll get better and appreciate pie making more.
Enjoy the process, trust your gut, and don’t worry about mistakes. Baking is a journey of learning, and every pie you make brings you closer to being a pro.